AoS Shorts: Your Essential Guide to Age of Sigmar

Maggotkin of Nurgle

Hey guys, welcome to the first AoS Shorts episode for 2018.  With such a great release as Maggotkin of Nurgle, I just couldn’t resist putting out a show.  Twitter is awash with green frothy enthusiasm and the book has been covered in detail by the great Facehammer podcast, Chris Tomlin’s on TGA and Tyler Mengel (links below), so I highly recommend you check them out.  However, as always, I think there is room for the AoS Shorts treatment.  So in the next 20 minutes or so, I hope to cover the key points you need to know – whether you intend to play Maggotkin or will be facing them on the tabletop.

[podbean resource=”episode=wzdvj-8372b4″ type=”audio-rectangle” height=”100″ skin=”2″ btn-skin=”109″ share=”1″ fonts=”Helvetica” auto=”0″ download=”0″ rtl=”0″]

  1. First impressions – Maggotkin of Nurgle playstyle
  2. Maggotkin of Nurgle allegiance
  3. Allegiance ability – Cycle of Corruption
  4. Feculent Gnarlmaw
  5. Contagion Points
  6. Command Traits
  7. Artefacts
  8. Lore of Nurgle
  9. Warscroll Battalions
  10. Allies and Summoning
  11. Maggotkin of Nurgle Army List Predictions
  12. Which armies will do well against Maggotkin of Nurgle?
  13. Conclusion and Further Reading

First impressions – Maggotkin of Nurgle playstyle

Overall, the Maggotkin of Nurgle battletome looks internally balanced with a range of choices for Nurgle generals.  There seem to be few automatic selections and from all the chat that has been flying around, there are a lot of army list ideas out there.  This has to be the just reward of the more extensive feedback and playtesting the book went through.

Resilient

In terms of playstyle, the Maggotkin are still super resilient – whether through debuffs to hit, more widespread methods for ignoring wounds and mortal wounds and through regeneration/healing.  If you don’t apply enough firepower to your target, then you will quickly find those large models will be back up to full strength.

Movement buffs to overcome Nurgle’s slow nature

Characteristically Nurgle armies have been slow and shambling, but the new book allows you a number of ways to counteract that (through the new Feculent Gnarlmaws, the Bell on the Great Unclean One and the Cycle of Contagion).  Don’t underestimate the speed with which you could have Nurgle units in your face early game.

Mortal wound output

Finally, the book is awash with mortal wound output.  Not in a Disciples of Tzeentch way, but in a steadily chipping off a small number of wounds from multiple units kind of way.  There are 2 infinite range spells that do D3 mortal wounds to multiple targets and 1 infinite range ability that does D3 mortal wounds to multiple units.  Nurgle armies will grind you down and knock out your support heroes if you don’t neuter them.

Maggotkin of Nurgle rewards good play

Now, all of these characteristics can be tailored through intelligent use of command traits, artifacts and spells.  However, in the new General’s Handbook 2017 world of higher cost battalions, you will need to make choices.  You can’t have everything, and with the prevalence of special characters in Maggotkin of Nurgle lists (who can’t take generic traits), your available slots are even more limited.

So, in short, Maggotkin of Nurgle will reward top quality list writing and game management.  This is definitely not an auto-win army but in the hands of a skilled general it will perform well.  And there is enough choice that you won’t be bored with being pigeon-holed into one particular build.

Now with that out of the way, let’s look at the battletome in a bit more detail.

Maggotkin of Nurgle allegiance

Just like Blades of Khorne and the Disciples of Tzeentch, the Maggotkin of Nurgle army is split into three factions:  Rotbringers, Mortals and Daemons of Nurgle.

Armies with the Nurgle keyword can have the Nurgle allegiance, and within that, units with the Rotbringers, Mortal or Nurgle Daemon key words can access the command traits, artifacts and spells available to those keywords.  Because the army rests on the Nurgle keyword, you can freely use Pestilens and Slaves to Darkness units that share the Nurgle keyword (or that are given the keyword).

Allegiance Ability – Cycle of Corruption

The key allegiance ability is the Cycle of Corruption – the Nurgle wheel that we first saw in the Blightwar box (so pick one up for handy in-game tracking).  The Cycle of Corruption contains 7 effects, buffs and debuffs that apply to the battlefield for that battleround.  As the Cycle applies to the battlefield, it applies equally to both armies if you are playing against another Nurgle army.

At the start of the game, you roll a dice to determine the starting point on the wheel.  Each turn the wheel moves clockwise at the start of the hero phase.  Now one of the concerns of matched play gamers after seeing the Blightwar box was the difficulty of optimising list builds around a random roll.  However, the battletome contains a number of ways that you can modify the wheel in order to get the bonus you want when you need it (in particular, the Grandfather’s Blessing command trait, and the Foul Regensis spell known by all Nurgle wizards).  Through clever use of these abilities you can have mortal wound output every single turn.
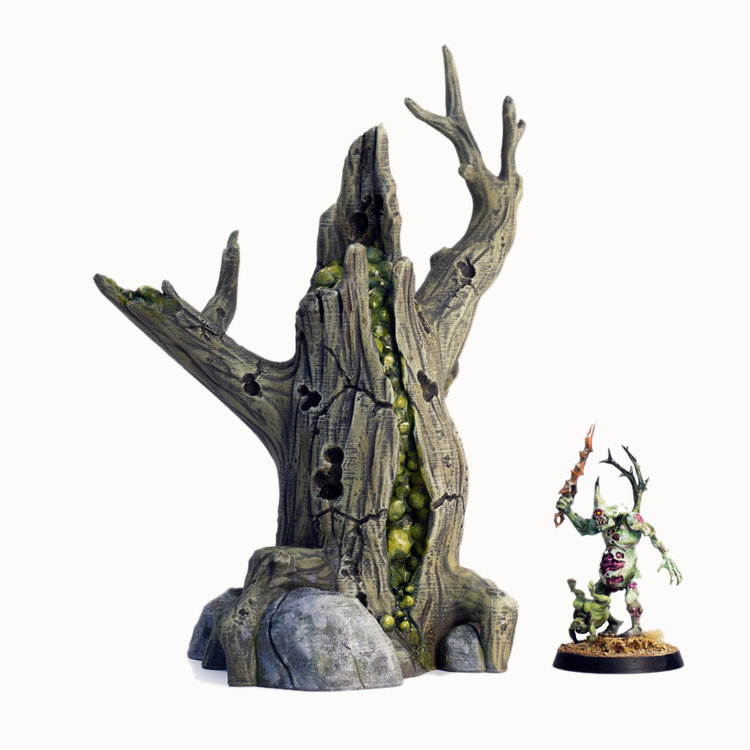
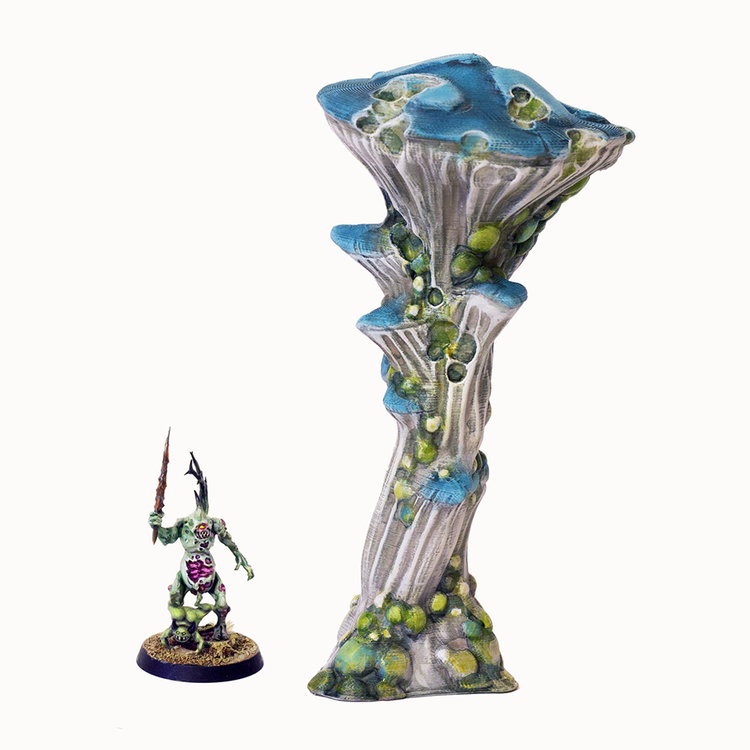
Feculent Gnarlmaw

The second aspect of the allegiance ability is that Nurgle armies come with free terrain, just like Sylvaneth armies.  At the beginning of the game, after rolling for scenario but before picking sides, a Nurgle player can set up a Feculent Gnarlmaw for free.  The Gnarlmaw is an infected wood that has an aura which causes mortal wounds to nearby non-Nurgle units and allows Nurgle units within 7″ of it to run and charge!

More Gnarlmaws can be summoned during the game by using Contagion Points (which I’ll get to) or brought onto the table by Horticulous Slimux, allowing some great board control.   I can also see them being very useful in scenarios which require heroes to hold objectives.  Put a Gnarlmaw on the objective and watch your opponent’s 5 or 6 wound heroes get chipped away by the mortal wound aura.

Feculent Gnarlmaw

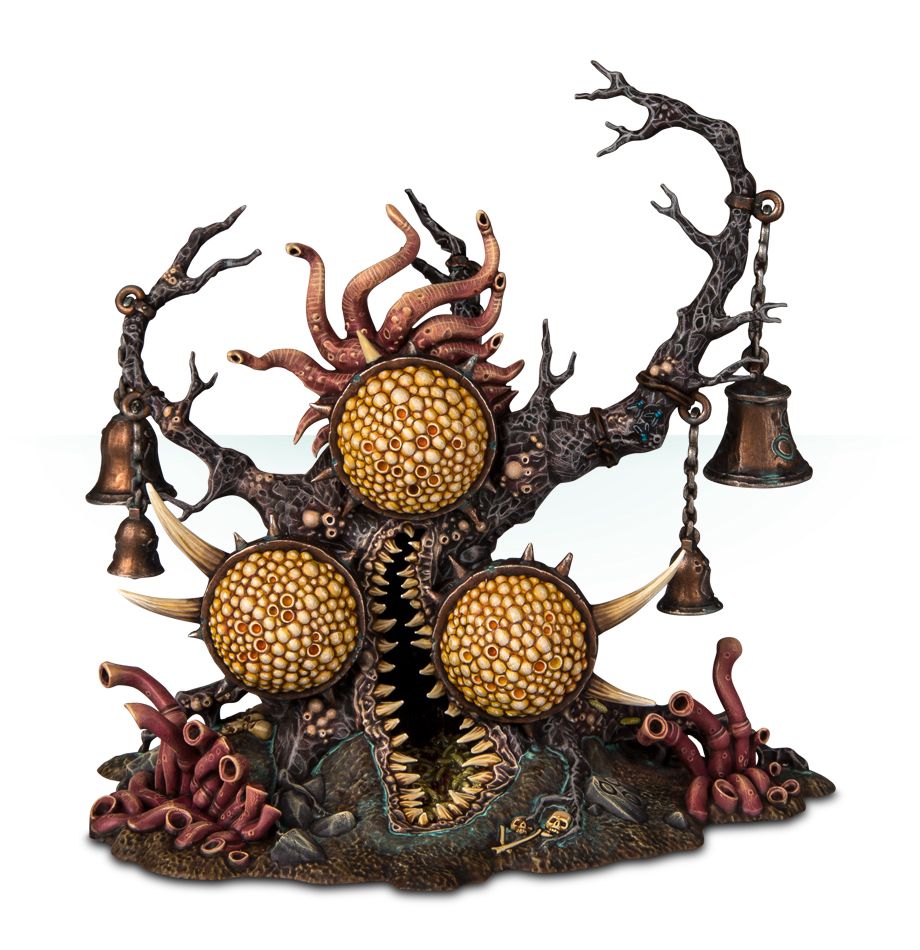
If you are looking for variations or alternative models for the Gnarlmaw, check out @garrisimo’s over at Age of Hobby.  They are a similar size and volume to the Games Workshop model.  More links and pics below.

Contagion Points

So Contagion Points, Nurgle’s own mechanic similar to Khorne’s Blood Tithe.  Nurgle armies earn Contagion Points in each of their hero phases based on having:

  • units in your deployment zone
  • units in your enemy’s deployment zone
  • Gnarlmaws with no enemies nearby.

New Nurgle summoning rules

These points accumulate during the game and can be spent on summoning Daemons of Nurgle.  The summoning rules for these Daemons have changed.  You can no longer summon Daemons of Nurgle by casting spells (bye bye Plaguebearers in Tzeentch lists for instance) and can only do so by spending Contagion Points.  Because you no longer cast a spell, there is no risk of being unbound, however you still pay reinforcement points for the unit in matched play.  The summoned unit is set-up at the end of your movement phase within 12″ of a hero or Gnarlmaw and at least 9″ away from enemies.

Now, given how the points accumulate, I don’t see mass Nurgle summoning lists being popular or effective – it just takes too long to accumulate points (see JabberTzeentch‘s analysis below).  The best use of the points seems to be to put more Gnarlmaws on the board early, and then perhaps summon a small unit for capturing objectives late game (or not at all).

Expected amount of Contagion Points if both sides have models in both territories on Turn 2 and there is 1 Gnarlmaw on the Board (same numbers based on 2 Gnarlmaws are in brackets).

Turn 1: 5-7 (6-10)

Turn 2: 13-17 (18-22)

Turn 3: 23-27 (30-34)

Turn 4: 33-37 (42-46)

Turn 5: 43-47 (54-58)

Command Traits

In terms of command traits, there are three shared command traits and three unique ones for each of Rotbringers, Mortals and Daemons of Nurgle.

As others have mentioned, I suspect the most common command trait you will see is likely to be Grandfather’s Blessing which allows you to move the Cycle of Corruption one way forward or back once per battle.

Artefacts

There are six unique artifacts for each of the factions.  There is a lot of choice here so I’ll just touch on the most common ones you will likely see.  For me, it is always worth using command traits and artefacts to support your army’s strengths rather than accommodate for their weakness.

Rotbringer

  • Rustfang – which when it causes a wound permanently reduces the armour save of an enemy unit for the rest of the game.
  • Muttergrub – which allows a wizard to cast an extra spell.

Daemons of Nurgle

  • The Endless Gift – In the battleshock phase the model can heal wounds taken that turn.
  • The Witherstave – Enemies within 12″ have to re-roll sixes to hit.
  • Tome of a Thousand Poxes – +1 to cast for a wizard, non wizards get a spell.

There are also some really powerful, but unreliable choices available:

  • Rotbringer: Fecund Flask – Once per game 2+ heal all wounds, 1 you die!
  • Daemons: Nurgle’s Nail – If you cause wounds with this weapon, you can roll 2D6 and on a 7 auto kill the model.
  • Mortals: The Eye of Nurgle – Once per battle, the nearest model to the bearer dies on a 2D6 roll of 7!

While these appear very powerful, the chance of rolling a 7 on 2D6 is 16.6%, or on average less than once a game if you could use it every turn.

Therefore, you will need to consider if the threat and board control of those artifacts are worth it vs something which may not be so sexy but will have more consistent and synergistic impact for your army.

Lore of Nurgle

The new Lore of Nurgle provides three spells per faction.  Each Nurgle wizard knows the Foul Regensis spell in addition to one from their lore.  This spell allows you to immediately reset the Cycle of Contagion to the stage of your choice (whether the effect goes off that turn, or simply sets you up for the next turn, will depend on the stage you choose).

High casting costs and short to mid range spells

As a general comment, the casting costs are high and the spells predominately have a short to mid range.  Therefore, if you are building an army around the spells you will need to buff the cast.  The Great Unclean One can now cast two spells and can be +2 to cast (using an artefact and the dagger), but is limited to the Daemon spells which aren’t as strong as the Rotbringer or Mortal spells.

Rotbringer spells

Rotbringer wizards can use Blades of Putrefaction which casts on a 7 and is a buff that means a unit inflicts a mortal wound as well as other damage if it rolls a 6+ to hit.  Notable mentions for Rancid Visitations and Gift of Contagion but both are more situational.

Nurgle Mortal spells

The best spell in the Nurgle Mortals lore, if not the book, is Plague Squall which on a casting value of a 6 allows you to dish out D3 mortal wounds to D6 enemy units visible to the caster (unlimited range!)

Daemons of Nurgle spells

There are notable mentions for the Glorious Afflications and Favoured Poxes debuffs in the Daemon spell lore, especially if you are playing a contain list, but now you can’t summon a wizard and then cast the spell.

Warscroll Battalions

I’m not going to go into the warscroll battalions here as I believe Chris covered everything you need to know in his TGA post.  However, I’d suggest that the most common battalion you’ll see is the Plaguetouched warband, which is in the Everchosen battletome.  I’ll discuss why shortly in the potential army build section.

Allies and Summoning

Now on to allies.  Maggotkin of Nurgle can ally with Khorne, Brayherds, Chaos Gargants, Everchosen, Monsters of Chaos, Slaanesh, Slaves to Darkness (excl Tzeentch), Warherds.

Three things to note:

  • Hellstriders of Slaanesh could be a useful addition in a stacking debuff Nurgle army due to their -1 to hit 6″ bubble;
  • you can still ally in a Gaunt Summoner with Familiars on Balewind thanks to the Everchosen keyword; and
  • while you cannot ally in Tzeentch daemons, you can of course still summon them – so if you don’t care about the lore, feel free to summon in some Pink Horrors 😉

NB: I’ll update the Chaos Allies matrix in the Resources section this week.

Summoning choices

In terms of summoning, a pool of about 120 points would work well – you could summon a Beast of Nurgle for some crucial positioning, 10 Plaguebearers, a Balewind, or a Herald of Tzeentch if you want to use the 18″ mortal wound spell.

Maggotkin of Nurgle Army List Predictions

Now I’m going to have a go at predicting some likely Nurgle army builds.  The Blightkings have been getting a lot of love online thanks to them getting cheaper and gaining an extra wound but I want to offer some alternatives.  Both of these have been proposed by local mastermind James Page – so all credit and responsibility lies with him.

“Control and sustain”

The first is a “control and sustain” build which uses Rotigus’ Deluge spell, a Great Unclean One, Glotkin, and support casters to put out a range of buffs and mortal wounds behind a safe wall of resilient troops.  I haven’t got a finished list in mind but the fundamentals are there for a solid list that will grind you down

Plaguetouched warband

The second is a Plaguetouched warband alpha-strike Chaos Knight list which can be one-drop or two.  The Plaguetouched warband contains 1 mortal nurgle hero and 7 mortal nurgle units and makes its units -1 to hit in combat, and can give some units the ability to do mortal wounds back to opponents that attack them.  Now, as we all know, Warhammer Weekly’s Tom writes all the successful lists in Age of Sigmar, and I know he has been a big fan of the Plaguetouched Warband – although I confess I haven’t seen or listened to his proposed list.

The list contains Glotkin, large units of Chaos Knights, a shrine and other support pieces.  The aim is to tie up all your opponent’s resources dealing with a buffed Chaos Knight unit which is in their face turn one.  The unit can be -1 to hit, have extra attacks for both the mounts and riders, re-rolling to wound, cause mortal wounds and be extra quick thanks to the Nurgle allegiance abilities.  With the movement buffs, you don’t need Sayl and don’t have to worry about charging from 9″ away.

One drop Plaguetouched Warband

  • Plaguetouched warband 100
  • Glotkin 420
  • Chaos Sorcerer 160
  • 14 Chaos Knights 480
  • 14 Chaos Knights 480
  • Shrine 180
  • 10 Marauders 60
  • 10 Marauders 60
  • 10 Marauders 60
  • 2,000 pts

Two drop Plaguetouched Warband

  • Plaguetouched warband 100
  • Glotkin 420
  • Rotigus 340
  • Rotbringer Sorcerer 120
  • 10 Chaos Knights 320
  • 10 Chaos Knights 320
  • Shrine  180
  • 10 Marauders 60
  • 10 Marauders 60
  • 10 Marauders 60
  • 1980 pts

This list foregoes the Plaguetouched warband buffs on the Chaos Knights but gives you access to the Rotigus Deluge spell and other mortal wound output to reach your opponent’s backline.

Check out the listbuilding show and the Masterclass podcasts to learn what to take into account when writing effective Age of Sigmar tournament lists.

Which armies will do well against Maggotkin of Nurgle?

Now which armies do I think will perform well against Nurgle?

Shut down the magic phase

Disciples of Tzeentch will of course still be strong – the army can unbind the Nurgle spells, has great chaff lines and can out duel Nurgle in the mortal wound fight (even with Nurgle’s disgustingly resilient saves).  Seraphon lists should also do well at shutting down the Nurgle magic phase.

Pure alpha strike to stop the Nurgle grind

Given the grind nature of many Nurgle lists, it seems like you need a very efficient alpha strike that can take out the Nurgle characters and support pieces before the rest of the army is buffed up.  Kharadron Overlords can achieve this, but if they don’t succeed then they will lose their own heroes very quickly and could be swamped under a green tide.

Pestilens – lovers of filth and weight of attacks

Finally, and don’t laugh, but Pestilens will actually play well against Nurgle.  The army will benefit from all the Nurgle buffs, is protected from Nurgle’s mortal wound output generally, and thanks to the Gnarlmaws could have a massive wave of Plaguemonks in combat turn 1.  If you make Nurgle take enough saves then not even the disgustingly resilient rule will save them.  If you are interested in Pestilens, I highly recommend you check out local New Zealand player Aiden’s TGA blog, the “Acolytes of the Withered Word”.

Conclusion and Further Reading

Thanks for listening – get in touch and let me know what you think.  It will be really interesting to see how the tournament meta changes over the next few months.  I expect we won’t have as long to wait as usual given how quick and easy it is to paint up a Nurgle army!

Further reading, reviews and resources

For all the information you need on Maggotkin of Nurgle, check out all these great reviews and resources.

Contact me on Twitter if you are interested in joining the WhatsApp group too.

Alternative Gnarlmaw models

Check these out if you are looking for alternative Gnarlmaw models.  You can find them here.
Gnarlmaw Gnarlmaw


New Zealand Age of Sigmar Masters 2017 Review Show

[podbean resource=”episode=iu7qb-80cd22″ type=”audio-rectangle” height=”100″ skin=”2″ btn-skin=”109″ share=”1″ fonts=”Helvetica” auto=”0″ download=”0″ rtl=”0″]

In this show, we recap the inaugural New Zealand Age of Sigmar Masters.  This is the first ensemble cast episode of AoS Shorts, as I am joined by James Page (NZ#5), Tim Lind (NZ#8) and Shaun Bates (NZ#2) .

We cover how the New Zealand Age of Sigmar rankings work, the criteria for attending the end-of-year Masters event, how the Masters tournament was structured and a run-down of the lists and games.

New Zealand Age of Sigmar rankings, lists and analysis

All you need:

An apology

Unfortunately, because we had four people calling in from different locations, we had a number of technical difficulties.  These have meant that the sound quality is worse than I would have liked, and there are some continuity issues in the show.  However, I still wanted to release the episode because:

  1. the guys had given their evening to come onto the show;
  2. I believe there is some useful information in the show; and
  3. I want to share the New Zealand Age of Sigmar scene with the global Age of Sigmar community.

Please get in touch

Get in touch with any comments, suggestions and questions – either through this site, on Facebook or Twitter.

Masterclass: Julien, the NZ Master

[podbean resource=”episode=a2742-80ad9c” type=”audio-rectangle” height=”100″ skin=”2″ btn-skin=”109″ share=”1″ fonts=”Helvetica” auto=”0″ download=”0″ rtl=”0″]

Today’s Masterclass episode is with the inaugural New Zealand AoS Master, Julien Lestat.   Julien is an ex-40k European Team Championship player and is #4 in the NZ AoS Rankings.

Julien covered how he prepared, planned and played his winning Clan Skryre list.

Clan Skryre – Julien’s list

Julien’s list was:

  • Arch Warlock (General) with Cunning Creature and Esoteric Warp Resonator
  • Warlock Engineer with Vigordust Injector
  • Warlock Engineer
  • 5 Skryre Acolytes
  • 3 Stormfiends with Warpfire Projectors
  • 3 Stormfiends with Warpfire Projectors
  • Warpgrinder team
  • Warpfire Thrower team
  • Warp Lightning Cannon
  • 10 Plague Monks with Foetid Blades, Bringer of the Word with Plague Scroll, Icon of Pestilenece, Contagion Banner
  • 10 Gutter Runners
  • Clan Skryre
  • Arkhspark Voltik
  • Gautfyre Skorch

The other lists are here, and you can find Jim’s commentary on each of the lists over at the Tronhammer blog. Also check out my list design show and the other Masterclasses.

Masters Recap

For a full recap of the NZ Masters, listen to my recap show with Jim Page, Tim Lind and Shaun Bates (to be released tomorrow).  Please excuse the choppy nature of the show, we had a number of technical difficulties.

Thankfully Tim also covered the Masters over at Tronhammer (Day One, Day Two).

Get in touch with any comments, suggestions and questions – either through this site, on Facebook or Twitter.

General’s Handbook 2017 Scenarios

Hi everyone, in today’s update, we cover each of the General’s Handbook 2017 scenarios.  Having had the book for a few months now, it is a perfect opportunity to record some on strategy and tactics for each of the General’s Handbook 2017 scenarios with the benefit of plenty of play.

Joining me is Chris Welfare (@WoundedMortally) of the excellent competitive Age of Sigmar show, the Mortally Wounded podcast .  Chris is #5 in the Australian rankings, and even came 3rd at the Element Games Grand Slam this year on a trip to the UK.

Knife to the Heart (Similar to take and hold)

[podbean resource=”episode=p77r6-7d4116″ type=”audio-rectangle” height=”100″ skin=”2″ btn-skin=”107″ share=”1″ fonts=”Helvetica” auto=”0″ download=”0″ rtl=”0″]

  • Deployment Zone: Diagonal deployment
  • Distance: Set-up only 9” away from enemy territory (18” apart)
  • Objectives: two objectives placed 20” in from each deployment corner
  • Capturing:
    • Control at the end of any turn (within the battleround)
    • 5 or more models (from any number of units) within 6” AND no enemy models within 6”
  • Victory
    • Major win from battleround 3 onwards if control both objective
    • Otherwise minor win on kill points
  • As Tom Mawdsley mentioned on Facehammer, it can be worth considering how you will play Knife because if you can win a major on this then you can pull away from the rest of the pack fighting for the podium.

Army Strengths & Weaknesses

  • Favours hammer and anvil forces – 50% static Defensive, 50% mobile offensive (e.g. Hammerstrike Force + Thunderhead brotherhood)
  • Defensive forces tend to win on the minor due to 50% of an army attacking 100%.
  • Alpha-strike lists mixed success, first turn strikes usually lose due to above if opponent bunkers and army is not full alpha strike. Therefore, alpha strikes need to send 90%+ across the board.
  • More successful alpha-strikes tend to be those that can delay until choosing – e.g. ripperdactyls in a shadowstrike
  • Strong for Kharadron Overlords, Arkanaut company with light skyhooks on home objective, clown car attacks enemy objective – balloon boys grapneling across late game.
  • Weak for elite armies due to low model count, e.g. Beastclaw as need at least 10 models alive to be able to score a major – However Skal can be key to winning with beastclaw due to delayed ambush of 5 (or more) models onto home objective (which opponents often forget about), letting you run entire powerhouse army at opponent to smash them off
  • Late teleport – protect your home objective, chip away from distance and then assault their objective late game – think Sylvaneth, Vanguard SCE

Check out Russ Veal’s tactica for the scenario over on Warhammer Community.

Total Conquest

[podbean resource=”episode=m79yx-7d415e” type=”audio-rectangle” height=”100″ skin=”2″ btn-skin=”109″ share=”1″ fonts=”Helvetica” auto=”0″ download=”0″ rtl=”0″]

  • Deployment Zone: Zig-zag deployment
  • Distance: Set-up only 9” away from enemy territory (18” apart)
  • Objectives:
    • four objectives placed 12” deep and 18” wide from the board edges ie in the centre of each board quarter.
  • Capturing:
    • Control at the end of any turn
    • Unit of 20 or more models (only need 1 model within range) within 6” if no enemy unit of 20+ within 6”, otherwise most models within 6”
    • A unit can only contribute towards scoring a single objective each turn
    • Tap and go objectives
  • VP Scoring
    • 1 point scored for each objective controlled at the end of each player turn
    • 2 points instead if it was taken from the opponent that turn
  • Victory
    • Major win at the end of the game for most points, otherwise minor win on kill points if tied on objective points

Army Strengths & Weaknesses

  • Favours horde armies, especially with resilience (30 man Nurgle units) very strong due to closer deployment making up for low movement.
  • Can be favourable to let opponent go first so they only score 1 point in their first turn, where you can score two by taking it back. So if your opponent gives you the turn, consider whether you can hold the objective against the counterpunch.
  • Death star armies can be strong due to tap and go objective scoring. Love this with my Hunters.

Check out Russ Veal’s tactica for the scenario over on Warhammer Community.

Duality of Death (Similar to Three Places of Power)

[podbean resource=”episode=75uef-7d4171″ type=”audio-rectangle” height=”100″ skin=”2″ btn-skin=”109″ share=”1″ fonts=”Helvetica” auto=”0″ download=”0″ rtl=”0″]

  • Deployment Zone: Central rectangle deployment, 12” in from the sides, 12” deep.
  • Distance: Set-up 12” away from enemy territory (24” apart)
  • Objectives:
    • Two objectives on the centre line, 18” in from the board edges
  • Capturing
    • HEROES and Behemoths control objectives
      • Not all MONSTERS are behemoths and not all behemoths are MONSTERS) so be careful with controlling units (e.g. Khorgoraths not allowed – any other examples? Hydra etc?)
      • Control at the end of any move (but not retreats) if ending within 3”.
        • Move excludes set up – SCE, Fyreslayers, Sylvaneth
      • First to arrive controls it, if controlling model is slain by enemy HERO or Behemoth within 3” then they gain immediate control.
        • If controlling model is killed by another unit, then
      • Additionally any non-Behemoth HERO heals wounds equal to VPs scored.
        • Good for Prime etc. Bad for Treelord Ancient.
  • Scoring:
      • VPs scored at the end of your turn  – equal to number of your turns of control from THAT model.
        • Favours seizing when you can get a double turn.
        • Need a quick game for fairness.
  • Victory
    • Major win at the end of the game for most VPs, otherwise minor win on kill points if tied on objective points

Army Strengths & Weaknesses

  • Resilient HEROES/ Behemoths obviously strong, e.g. Stardrakes. Due to cumulative scoring.
  • Numerous HEROES not actually required due to low number of objectives,
    • 1 can be enough to win,
    • however Stormcast usually strong in this scenario due to lots of relatively cheap but resilient heroes (3+ save/2+ with staunch defender-2 against shooting from mirror shield).
    • However mortal wounds are an issue (Tzeentch wizards).
    • Tzeentch and Fyreslayers also have large numbers of heroes in lists normally but not as resilient.
  • Objective denial through unit blocking can be critical to success (3” is a small control zone which can be denied through model placement)
  • Weak for armies with little ranged threat to kill bubble-wrapped characters
  • Strong for turn 1 tunneling/lightning strike armies, as centralised deployment zones force 12” gaps to the side, meaning 9” spaces can be exploited
  • Extremely strong for Fyreslayers against armies with little shooting, due to turn 1 runesmith tunneling onto objective surrounded by Vulkites. Won’t score turn one but you’ll be very hard to shift.

Check out Russ Veal’s tactica for the scenario over on Warhammer Community.

Battle for the Pass (Similar to Border War)

[podbean resource=”episode=ve9n3-7d4194″ type=”audio-rectangle” height=”100″ skin=”2″ btn-skin=”109″ share=”1″ fonts=”Helvetica” auto=”0″ download=”0″ rtl=”0″]

  • Deployment Zone: Lengthways deployment
  • Distance: Set-up 12” away from enemy territory (24” apart)
  • Objectives: four objectives placed 18” deep and 12” wide from the board edge
  • Capturing:
    • Control at the end of any turn
    • Unit of 20 or more models (only need 1 model within range) within 6” if no enemy unit of 20+ within 6”, otherwise most models within 6”
    • A unit can only contribute towards scoring a single objective each turn
    • Tap and go objectives
  • Scoring
      • 1 point scored for own deployment zone objective,
      • 2 for each central objective and
      • 4 for enemy deployment zone objective.
      • 9 points available a turn.
  • Victory
    • Major win at the end of the game for most VPs, otherwise minor win on kill points if tied on objective points

Army Strengths & Weaknesses

  • Favours horde armies, due to 20+ units trumping model count.
    • Use waves to keep disrupting the enemy held objectives.
  • Also favours summoning/tunneling/lightning strike armies, as deeper deployment zones often leave larger gaps behind enemy forces meaning 9” spaces can be exploited to get close to their home objective which is worth the most points. Big thing to watch out for.
  • Usually strong for Sylvaneth if taking turn 1, as can usually bunker down on home and both side objectives in woods and hold for 3-4 turns, not needing to over extend and go for opponents home objective.
    • However no longer as easy for tree revenants to steal opponent’s home objective with a late game teleport due to objective being further from the board edge.
    • How I love to play it. Harder due to model count now, unless running dryad heavy.

Check out Russ Veal’s tactica for the scenario over on Warhammer Community.

Starstrike (Similar to Gift from the Heavens)

[podbean resource=”episode=6qag7-7da4c7″ type=”audio-rectangle” height=”100″ skin=”2″ btn-skin=”109″ share=”1″ fonts=”Helvetica” auto=”0″ download=”0″ rtl=”0″]

  • Deployment Zone: Regular deployment (72” x 24”)
  • Distance: Set-up 12” away from enemy territory (24” apart)
  • Objectives:
    • One objective lands on the centre line at the start of the second battleround, BEFORE priority. 1-2 left hand side, 3-4 centre and 5-6 right hand side.
    • 18” in from the board edges or centre of the board
    • Third battleround BEFORE priority 2 more objectives land, 1 on the centre line of each territory, randomised as before
  • Capturing:
    • Control at the end of any turn
    • More models within 3”
    • A unit can only contribute towards scoring a single objective each turn
  • VP Scoring:
    • Points scored per controlled objective equal to current battleround.
      • Again quick play needed for fairness
      • Don’t lose heart. Game can swing really quickly.
  • Victory:
    • Major win at the end of the game for most points
    • minor win on kill points if tied on objective points

Army Strengths & Weaknesses

  • Favours fast/teleporting/summoning armies and resilient/summoning armies. Fast/teleporting/summoning armies strong early game due to ability to adapt to randomness of objective positioning, resilient/summoning armies strong late game due to increased points per objective.
  • Potentially a good scenario to go first in, in order to ‘waste’ opponents double turn from 1-2 and aim for a late game double turn. Ability to react to the second drop, gain points to pull into the lead and then hold on.
  • Seraphon potentially very strong (dependant on list design), due to delaying ripperdactyls until objectives placed, and Lords of space and time allowing 1-2 units to teleport each turn.

Check out Russ Veal’s tactica for the scenario over on Warhammer Community.

 Scorched Earth

[podbean resource=”episode=iuhxr-7da4d3″ type=”audio-rectangle” height=”100″ skin=”2″ btn-skin=”109″ share=”1″ fonts=”Helvetica” auto=”0″ download=”0″ rtl=”0″]

  • Deployment Zone: Regular deployment (72” x 24”)
  • Distance:  Set-up 12” away from enemy territory (24” apart)
  • Objectives:
    • Six objectives, 3 on the centre line of each deployment zone, 1 central and two 12” in from the board edges
  • Capturing
    • Control at the end of any turn
    • More models within 3”
    • A unit can only contribute towards scoring a single objective each turn
  • VP Scoring
    • 1 point scored per controlled objective at the end of each player turn, but can raze (destroy) an objective held in enemy territory for D3 points.
  • Victory:
    • Major win at the end of the game for most VPs
    • minor win on kill points if tied on objective points

NB: getting house ruled at some tournaments. Reasoning being that by preventing burning it avoids the non-game for some armies. Player enjoyment key driver because not everyone will have the ability to (or want to) adapt to face a Murderhost in this scenario.

Army Strengths & Weaknesses

  • Murderhost known to be very strong due to extremely fast turn 1 movement and hitting power, usually able to raze all 3 objectives in enemy territory on turn 1.
    • However can be countered by Tzeentch splitting horrors from a line to a clump, due to contracted area around objective and smaller base size outnumbering the line of bloodletters.
    • Can also be countered if you outdrop the murderhost and can take first turn (ie you have 1 or 2 drops). Push the murderhost back by focusing on one part of the board.
  • Similar tactics can be used by other armies with chaff units on 25mm bases if standing in a central clump behind a unit on the 12” line as bloodletters often need to spread in a line to get all their attacks so won’t all be within 3”.
  • Standing further back from the objectives while risky, can also prevent turn 1 razings by denying charges. Murderhost needs to move 22” on turn 1 to be in range of an objective. Average move is 23” (5D6 +6”) so not too unlikely that at least some units will fail. Benefit is your units don’t die and can then push back over a double-turn.

Check out Russ Veal’s tactica for the scenario over on Warhammer Community.

 Links

Masterclass: Gary Percival on Kharadron Overlords

[podbean resource=”episode=8raww-79bafc” type=”audio-rectangle” height=”100″ skin=”2″ btn-skin=”109″ share=”1″ fonts=”Helvetica” auto=”0″ download=”0″ rtl=”0″]

Today’s Masterclass episode is with Gary Percival, UK#4, on Kharadron Overlords under General’s Handbook 2017.

Gary’s recent tournament results with Kharadron Overlords include:

  • 2nd at the Games Workshop GT Heat 3;
  • 4th at the Bravery One British Open; and
  • 8th at the GT final.

Kharadron Overlords – “like a firework”

Gary talks about Kharadron Overlords in the current meta and the thoughts behind his list.  He also explains how he approaches each game, deployment strategies, the tactics he uses and his tips for playing against Murderhost and Disciples of Tzeentch.

Kharadron Overlords

Where to find us

You can find Gary on Twitter at @garypercival8 and me at @antipodean7.

As always, check out the other resources on this site and AoS Shorts on Facebook.

All feedback, comments, criticism and ideas welcome so please get in touch 🙂

Further resources

For more tips on how to write effective army lists and tournament play check out these shows:

XL: London AoS GT / How to write a list for a tournament pack!

[podbean resource=”episode=qkn8i-7954ce” type=”audio-rectangle” height=”100″ skin=”2″ btn-skin=”109″ share=”1″ fonts=”Helvetica” auto=”0″ download=”0″ rtl=”0″]

On today’s episode, I’m joined by the organisers of the London Age of Sigmar Grand Tournament, Tom Loyn and Jack Armstrong, to discuss their tournament pack and how to take into account a tournament pack in writing your army list.  How to consider the scoring system, tiebreakers, scenarios, objectives and meta to write the best army list possible!

Tom and Jack are perfectly placed to advise on this topic:

  • Tom is the captain of Team Wales, and
  • Jack is the current UK#8, winner of the Facehammer GT, 3rd at the South Coast GT, and the first player ever to get a perfect 400 in the UK rankings.

The London Age of Sigmar Grand Tournament

The London AoS GT is being held on 19 and 20 May 2018 at the Westminster Academy Sport, Torquay St, London W2 5EW.  It will be a 2,000 point matched play tournament using General’s Handbook 2017, a Win / Loss / Draw scoring system and with some additional in-game quests as the first tiebreaker.

The London AoS GT is being held as part of the London Grand Tournament, a tabletop wargaming convention that is centred around organised play.  In London, every May, hundreds of hobbyists get together to throw dice and have a whole lot of fun.​

Originally conceived in a pub late one cold winter night, the LGT has grown from a Warhammer 40k GT to a multi-system wargaming convention, including additional events such as an Age of Sigmar GT, Blood Bowl, Necromunda, Warmaster and a narrative Horus Heresy event.  Last year, Warhammer Live streamed the 40k GT on Twitch!

Buy tickets from 1 November

Ticket sales and the full pack will go live on 1 November (next Wednesday!).  Go to the website to purchase tickets and to sign up for their mailing list for priority ticket access and updates on the event.  Check it out: https://www.lgtpresents.co.uk/aos

Where to find us

You can find Tom on Twitter at @tloyn, Jack at @jackwarmstrong and me at @antipodean7.  As always, check out the other resources on this site and AoS Shorts on Facebook.

All feedback, comments, criticism and ideas welcome so please get in touch 🙂

Further resources

For more tips on how to write effective army lists and tournament play check out these shows:

XL: Summoning in Matched Play

[podbean resource=”episode=m54im-787b5b” type=”audio-rectangle” height=”100″ skin=”2″ btn-skin=”109″ share=”1″ fonts=”Helvetica” auto=”0″ download=”0″ rtl=”0″]

This episode I’m joined by Tim Lind of Tronhammer and @TronhammerNZ on Twitter.  We cover summoning in matched play, with a particular focus on Death.  Summoning, and reinforcement points, is an area of the game which can lead to confusion, especially for newer players.  In this show, we:

  • set out the rules for summoning
  • provide advice on how to take into account summoning in list-writing and
  • cover some tips and tactics for using summoning on the table.

I’ve set out our draft show notes below, but it is definitely worth listening to the show as we elaborate on these notes.

NB: Note that with the Legions of Nagash Battletome there have been significant changes to summoning which affect the content of this show.   Check out the initial impressions show on the Nagash battletome.

What is Summoning in Age of Sigmar?

Summoning is the ability to bring new units to the battlefield, or bringing back units that have been destroyed, over the course of a game.

This is done through the use of:

  • Spells, such as those found on most Seraphon warscrolls, and many Death or Daemon warscrolls.  These are cast in the same way as any spell in Age of Sigmar.  If the spell succeeds, you can place a unit of models from that warscroll within range of the caster (usually 18”), but not too close to the enemy (usually more than 9” away).
  • Abilities, found on individual warscrolls like Neferata’s Mortarch of Blood rule. Abilities can vary in the way they can summon models. In the case of Neferata, every time she slays an enemy HERO she can summon a Vampire Lord.
  • Army or Battalion abilities, such as the Heralds of the God King ability on the Hammers of Sigmar Warrior Chamber warscroll battalion. This ability summons a unit of Liberators to the battlefield each time one of the Liberator units is destroyed on the roll of a 6.

We will cover many of these spells and abilities later on in the show.

In Open or narrative play, there are no restrictions, other that what players agree among themselves, to what can be summoned to the battlefield. However, our focus will be on Summoning in Matched Play.

In Matched Play, each time a new unit (or a destroyed unit is brought back) to the battlefield, it costs ‘Reinforcement Points’. This cost limits amount of models that are able to be added to the army so that the odds do not become too overwhelming!

Why Summoning?

Like deployment mechanics, it is a way for various armies to gain some tactical flexibility – one of the many ways AOS opens up to such a range of possibilities. You can:

  • Keep your opponent guessing – make them account for a wider range of possibilities, as they don’t know what troops you will bring to the field, or where they will drop. This forces them to make choices – and as Dan says, every choice is a chance for a mistake. This is the most important one, and it doesn’t come across ‘on paper’. It allows you to control the game, so long as your summoning is reliable enough. The more you keep in reserve, the more your opponent has to guess.
  • Counter your opponent’s threats. Road blocks, extra chaff, scalpels, objective scoring, board control.
  • Make your list more flexible. Keep the allegiance you want but still use warscrolls from outside that allegiance, beyond the allies allowance.

What are reinforcement points?

Reinforcement points are a pool of points set aside, out of your total army’s points allocation, out of which you can summon units. I might write a list with 1,600 points worth of units, and specify a pool of 400 reinforcement points, for a total of 2,000 points. Note that summoning does not increase the army beyond the points limit.

So why bother with summoning then? This is a question I hope we can answer by the end of the show, as there are many reasons why summoning is a useful mechanic to take advantage of.

Let’s start with how to build a list with reinforcement points, which will allow us to summon during the game!

Building a list with reinforcement points

As mentioned before, you need to set aside a portion of your army’s points as Reinforcement Points. If you are playing a 2,000 point game, the minimum units you need to have on your list are a hero to be your general, and three units of battleline. Other than those four units, you can fill the remainder of your list with Reinforcement Points, or (probably more sensibly) leave a smaller amount.

To decide how many points you want to set aside, you will want to plan what units you are going to summon first. And this is really where most of the thinking has to happen. Here are some of the main considerations:

  • What strategic gaps do you have in your army? Do you need to summon chaff, heroes, fast units, roadblocks, monsters?
  • What abilities do your units have that you need reinforcement points for? For example, the Flamespyre’s Phoenix Reborn ability. If you want to make use of the rebirth you need to make sure you have enough Reinforcement points to pay for it. If it is an ability that will seldom trigger,  Neferata’s ability for example, you might decide not to bother, as you might not even get to use the points, which would be a waste.

Some advantages to consider:

  • Allegiance restrictions
    • Summoned units are not part of your army list, so you can summon units that you could not normally take due to allegiance restrictions. A Death army with the Deathrattle allegiance for example, wants the Grave Guard to be battleline, but also want to take a Terrorgheist. No worries! Just take a Necromancer as an ally, and summon that thing! So long as you are lucky on the dice.
  • Choosing the right tool for the job
    • You can summon different units in each game. So at a tournament,  playing Duality of Death battleplan you might want to summon a hero or behemoth to help take objectives. Later in the tournament, playing Battle for the Pass, you might instead want to summon some more rank and file to help overwhelm objectives.
    • You also have a toolbox with which to counter specific threats from different armies. If you know you will be facing an army with lots of rend, you could summon Nighthaunt units, who ignore it. Of against armies with low bravery, a Terrorgheist to make the most of the Death Shriek.
  • Final list size and triumphs
  • Why have a large summoning pool?
    • Flexibility
    • Risk that units will never make the table
  • Scenery – now use reinforcement points, so do not need to be included on your list. Most obvious example is Balewind Vortex, which every grand alliance can use.

What about scenery? Do you need to name it on the list? Or can you leave yourself the option to not summon a vortex?

Tournament house rules / etiquette

  • Disclosing the possible things you could summon vs sealed mystery box under the table
  • Scoring against summoned units

How do you summon new units during the game?

  • Spells and abilities to be aware of
    • There are many, I will cover some below. Mostly Undead, Seraphon, daemons.
  • Some spells allow you to bring more models to the table if you roll high enough on the cast roll. Still have to pay for these units.
  • Sneaky tactics etc – “within” vs “wholly within”
  • Summoning at the bottom of a turn if you want to get units into combat – 9” distance vs charging
  • Summon a caster who then summons balewind (or more units) – daisy-chaining
  • Do you get the kill points if you kill the caster before the summoned units are on the board?

Reinforcing existing units

  • Banners
    • Which models can you restore (ie bring back 5 banners when you only had one in the unit to start)?
  • Spells for regrowing units
  • Do we want to cover Horrors splitting?  Probably worth just a mention and then move on, otherwise the show will be very long.

Resurrecting models

  • Models that “die” and come back – when you pay points – clearing up any confusion

Examples of Great Uses for Summoning

Death Builds

  • Nagash
    • casting bonuses, unit size doubling – getting more to the table faster and more reliably. Can start with min battleline and summon whole army.  If your opponent doesn’t know what you are fielding, or where they will be, forces them to make choices and have to account for extra possibilities.
    • Solid choice is skeleton warriors, but it’s useful for Grave Guard, multiple heroes and monsters. Still have to pay the points.
  • Arkhan
    • Similar to Nagash for reliability, some extra range. Rather than summoning whole army, you use ‘scalpel’ – right thing for the right target in the right place.
  • Other
    • Stack casting bonuses with Morghast, Mortis Engine, Corpse Cart, Arcane terrain, allegiance abilities.
    • Majestic Horror for FEC
    • Master of Black Arts – Wight Kings or Wraiths into wizards
    • Sword of Unholy power – free summon spell. Instead for 10+ to cast
  • What to summon
    • Mourngul for debuff and to hold down flank
    • Grave Guard for the damage
    • Morghast Harbingers for charging same turn
    • Morghast Archai for reaching over chaff
    • Terrorgheist for low bravery
    • Skeletons/Zombies for extra flak
    • Cairn Wraiths for hero

Further Reading


Masterclass: Rhellion on how to win with net lists

[podbean resource=”episode=bpgz7-78c8e4″ type=”audio-rectangle” height=”100″ skin=”2″ btn-skin=”109″ share=”1″ fonts=”Helvetica” auto=”0″ download=”0″ rtl=”0″]

Today is the second AoS Masterclass episode, in which I chat with top-tier tournament gamers about Age of Sigmar tactics and how to improve at tournament play.

This time I’m joined by top US tournament gamer, Brad Schwandt (or Rhellion all over the internet).  Brad is from South East Michigan and his recent accolades include:

  • 1st Best Overall at:
    • Blood in the Sun GT 2016
    • Waaaghpaca 2017
    • Adepticon 2017 team tournament
    • Midwest Meltdown
    • Michigan GT
  • 4th and Best Destruction at Adepticon GT 2017

How to improve at Age of Sigmar tournament play

We discuss list design, matched play under General’s Handbook 2017, and improving your play on the tabletop.  In short, “how to win with a net list in one easy step…”  (contents of show aren’t quite so facetious).

Brad covers the current meta, how he practices with his list and the things he takes into account when playing Age of Sigmar.

Disciples of Tzeentch winning army list

Brad’s winning list at the Michigan GT was:

Lord of Change, magical supremacy, rod, tzeentch’s firestorm
Kairos, unstable mutation
Blue Scribes, fold reality
Changeling, arcane transformation
Herald of Tzeentch, bolt of tzeentch
Gaunt Summoner, draught, glimpse future

10 pink horrors, treason of tzeentch
10 pink horrors, unstable mutation
10 pink horrors, bolt of tzeentch
10 blue horrors
10 brimstone horrors

Changehost
250 summoning / reserve

You can find Brad on Twitter as @Rhellion and me as @antipodean7.

If you like the Masterclass format, you can check out my Masterclass show with Tony Moore, Team England AoS captain.

Still keen to hear feedback, questions you would have asked, suggestions of people you’d want to hear from 🙂 get in touch & let me know!

Masterclass: Tony Moore

The first Masterclass interview for AoS Shorts – a series of interviews with top tournament Age of Sigmar gamers from around the world about how they approach the game.

[podbean resource=”episode=8wd4p-778aa1″ type=”audio-rectangle” height=”100″ skin=”2″ btn-skin=”109″ share=”1″ fonts=”Helvetica” auto=”0″ download=”0″ rtl=”0″]

We cover everything from list-building, preparing for a tournament and play on the table-top.

Today I’m joined by Tony Moore, team England captain and current #3 in the UK Age of Sigmar rankings. Tony has had great success with both Disciples of Tzeentch and Death.

You can find Tony at @thecountmoore on Twitter and on TGA.community.  The UK Age of Sigmar ranking are available here.

Check out all the other Masterclass interviews on the site.  Each successful tournament gamer has given their own impressions on the tournament meta and how you can improve.  The shows are definitely worth checking out.

As always, you can find me at @antipodean7, and AoS Shorts on Facebook.


General’s Handbook 2017 – Key points from the Age of Sigmar FAQs!

[podbean resource=”episode=mvktw-71de92″ type=”audio-rectangle” height=”100″ skin=”2″ btn-skin=”109″ share=”1″ fonts=”Helvetica” auto=”0″ download=”0″ rtl=”0″]

Games Workshop has released new and updated Age of Sigmar FAQs to accompany the release of General’s Handbook 2017.  This show will focus on those Age of Sigmar FAQs and what you need to know for matched play.

The Age of Sigmar FAQs not only clear up interpretation disputes, or provide extra clarity, but in some cases they completely rewrite or errata existing rules.  Therefore, it is important to read them.  As a result, I’m also not limiting this show to the changes introduced alongside the General’s Handbook 2017.  I’ll also try to cover the key points in the FAQs which may not be known to newer matched play players.

The key points that I’ll cover are:

  • how Games Workshop has addressed stacking abilities;
  • the changes to reinforcement points;
  • a brief comment on deployment, movement and measurements; and
  • the most significant army specific changes which will impact tournament play.

I’m also going to use separate shows to cover:

  • the order of activation between rerolls, modifiers, and multipliers; and
  • allegiances, factions, and allies – especially amongst the Chaos factions;

because both these topics seem to have caused much consternation online recently.

Now, before we get into the heart of the show, I’d like to draw your attention to a few handy resources available on the resources section of AoS Shorts.

  • I’ve compiled a text-searchable and indexed PDF that contains all the FAQs and Forgeworld and Compendium warscrolls – the site also has a single PDF of all the old FAQs if you need them for some reason.;
  • I have also created an allies matrix for each Grand Alliance, so you can easily see who allied with whom; and
  • finally, I started a thread on TGA to compile new questions that people have regarding the new rules.  So check it out and add your own question if something is not clear.

FAQs: Stacking abilities

The default position in Age of Sigmar is that spells and abilities are stackable unless stated otherwise.  By stackable, I mean that the same ability can be applied from multiple sources to the same target unit (for instance, to give several +1s to hit).  Unfortunately, this can lead to some perverse outcomes and incentives.

Now, the rules of one that apply to matched play mean that spells can’t be cast more than once per turn so they won’t be able to stack.  However, there is no such restriction on abilities (presumably, given the current variety in wording and sources of abilities).

Therefore, Games Workshop seems to have addressed some of these abilities by amending them through the FAQ so that they don’t stack.  Take for instance the Aether-Khemist ability which allowed them to select a weapon type in a nearby unit and give it +1 attack – now the FAQ has confirmed that “a single weapon cannot be augmented more than once per hero phase”.

Games Workshop have also clarified that if an ability says that it applies to units “within 6″ of any models with this ability” the ability will only apply once.  This approach has been used specifically for the:

  • Bloodsecrator, Portal of Skulls, Rage of Khorne – add 1 to the attacks characteristic for melee weapons used by friendly KHORNE units while they are within 18″ of any models with this ability…
  • Treelords’ Groundshaking Stomp – “at the start of the combat phase, roll a dice for each enemy unit within 3” of any models with this ability”

However, it is important to read warscrolls closely because some abilities still stack – for instance:

  • the Cauldron of Blood’s Bloodshield will stack (the “any” in the rule applies to the target unit rather than the unit with the ability and so is not caught by the recent FAQ);
  • abilities like the Bloodwrack Shrine’s Aura of Agony is effectively the equivalent of a shooting or magic attack and so will apply multiple times to the enemy units in range; and
  • the Harbinger of Decay’s Morbid Vigour rule also stacks as it applies to units “within 7″ of this model” (not “any” model etc).

While we are talking abilities, I note in passing that the latest General’s Handbook 2017 FAQ has fixed a typo and made it clear that command traits (rather than command abilities) and magical artefacts do not affect mounts (unless specifically stated).

FAQs: The changes to reinforcement points

With General’s Handbook 2017, we have seen a number of changes to reinforcement points which allow greater freedom in matched play.  Primarily with some of the Seraphon and Death artefacts, for instance the Ring of Immortality etc  which no longer require you to pay reinforcement points.

The FAQs have also confirmed three issues in relation to reinforcement points:

  • you need to pay reinforcement points every time you summon a Balewind Vortex (even if you only have one in your list);
  • If an ability, allows you to replace a model with a different model,  such as Alarielle’s ability to create Dryads from the enemy, the new models cost reinforcement points.
  • the splitting of horrors in Tzeentch armies is now clearer – you can use horror splitting to add models to an existing unit until the unit contains 10 models – but must keep the new horrors wholly within 6″ of the original unit (so can’t string them out in a line).


FAQs: Deployment, movement and measurements

The Age of Sigmar FAQs cover a number of points which I’ve loosely grouped into deployment, movement and measurements.

Deployment and battalions

Starting with deployment of battalions.  One of the key advantages of a battalion (and one of the reasons for the recent points increases) is that it allows you more control over deployment and the first turn.  This is because a battalion can be deployed in three ways: in one go, unit by unit, or a group of units with the remainder deployed unit by unit (what I like to refer to as 3,1,1).  See the warscroll battalions section of a battletome and check out my deployment episode for more on this topic.

Now, there had been some confusion about whether you can deploy battalions on a 3,1,1 basis because of answer in the previous FAQs to a question on the special deployment rules of a Wanderers battalion.  This answer had said that a battalion can only be deployed in one go or unit by unit.  However, this answer has now been removed, so there should be no doubt that a battalion can be deployed 3,1,1 (but you’ll just have to pay the higher points cost associated with battalions).

Deployment, moves and “set-ups”

“Set-up” is typically when a unit is placed on the table during deployment, but can also refer to a unit being deployed in a location other than on the battlefield or being put into play once the game has started (a unit using the Stormcast Eternal Warrior Chamber’s Lightning Strike, or the Treelord’s Spirit Paths ability, for example).  Models can be set up within 3″ of the enemy, even if they are set up in the movement phase, unless noted otherwise in the rules for the ability that allows them to be set up once the battle is under way.  Most abilities now however make it clear that you have to set-up 9″ away.

A common feature of some movement abilities is to allow a unit to move in the hero phase “as though it were the movement phase”.  What does this mean?  It means that you can move the distance based on your move characteristic, can’t move within 3″ of enemy model, it can run and retreat, and so on.  However, it will count as having retreated when it comes to later phases (for the purposes of shooting, charging etc).

Teleporting and special movement abilities

A number of models in the game have an ability to “teleport” from one part of the board to another – for example Sylvaneth through their Wyldwoods and now Seraphon with their new battle trait.  The issue was whether using that ability on a unit in combat counted as a retreat (meaning that the unit couldn’t shoot or otherwise act for the remainder of the turn).

The FAQ has now confirmed that “If an ability or spell allows a model to be set up elsewhere on the battlefield, and the model is originally within 3″ of an enemy,” the model is not counted as retreating unless the rule specifically states otherwise.  Note the difference with the abilities that allow a “move as though it were the movement phase”.

Pile-ins

A pile-in is a move in the combat phase.  Any unit that has charged or has models within 3″ of an enemy unit can attack with its melee weapons in the combat phase.  When you select a unit to attack, you may move each model in the unit up to 3″ towards the closest enemy model.  This is your pile-in move.

The new Age of Sigmar FAQs have confirmed that:

  • if a unit has charged, but all enemy models within 3″ are slain before the charging unit is activated, then the charging unit can still pile in, even if it can’t get within 3″ of another enemy unit.  This is a useful confirmation for combat armies wanting to get another 3″ move towards the enemy or an objective.  However, note that it only applies to units that have charged – if a unit has been charged, or it is an existing combat, and models are removed that mean it is outside 3″ it will not be able to pile-in.

Just a final note on pile-ins with units that have special pile-in rules.  It is important to check whether the unit can pile-in 6″ or be selected to pile-in even if it is outside 3″.  For example,

  • Units like tree-revenants can pile in 6″, but must have charged or been otherwise within 3″ of an enemy unit to pile-in, but once selected they can move 6″.
  • However, units like Yhetees can be chosen to pile in and attack if they are within 6″ of the enemy and then move 6″  – This is great for these units because they can sit safely outside combat, avoid being hit, and then pile in when needed.

Measurements – within / “wholly within”

The Age of Sigmar FAQs make it clear that if a rule requires a unit to be “within” a certain distance, you only need part of one model within that distance.  However, if the rule or ability requires the unit to be “wholly within” then you need to have every part of every model in that unit within the distance.  This rule is most common in relation to cover.

FAQs: the army specific changes

The last section is to note that there are a large number of army specific FAQs that are worth reading.

Order

  • As is probably well known by now, there are a number of changes to the Kharadron Overlords warscrolls;
  • Stormcast Eternals
    • Clarified Celestial Vindicators Warrior Chamber – Paladins can be set up within 12″ of the Prosecutors instead of 6″.
  • Sylvaneth
    • Silent Communion – “models” includes wyldwood
    • Confirmed that all of the Treelord Ancients, Branchwychs and Branchwraiths in the Gnarlroot battalion can cast and unbind one extra spell.
    • Drycha doesn’t hit herself or her own units when she uses her Flitterfuries attack

Destruction

  • The Stonehorn (and also the Tomb Kings equivalent) has had its Stone Skeleton rule changed.  Previously the rule halved all damage taken by the Stonehorn.  In a rather elegant change, now you have the damage characteristic (rounding up) of weapons that target the model.  What this means is that Stonehorns will take full damage from damage 1 units (such as infantry hordes) because 1 damage halved is still rounded back up to 1.  What makes it elegant is that these units will often have low rend, so the Stonehorn will still have a decent armour save.  High damage attacks (think Kurnoth Hunters with scythes) will still have their damage halved, but at least have the benefit of higher rend. The Stonehorn still halves the number of mortal wounds that it suffers.  That part of the rule is unchanged.
  • Staying with Destruction – Units of fanatics hidden in a unit must now all be released at the same time, and must all be placed within 1″ of the unit that is hiding them.

Death

  • With Death there isn’t much new, but the existing FAQs still provide for Zombie units to be able to merge to make really large units, and for you to be able to resurrect champions and hornblowers into skeleton units.

Chaos

  • Blood tithe in opponent’s phase
    • Change to the Blood for the Blood God battletrait – Blood tithe points can be expended at the start of either player’s hero phase, but only once per phase.
    • Blood Tithe points must be expended before your opponent uses any start-of-turn abilities in your own hero phase, or after your opponent has used any start of turn abilities in your opponent’s hero phase.
  • Tzeentch
    • Confirmed that Wizards gain one spell from one of two lores – the Lore of Fate or the Lore of Change – depending on whether they are a mortal sorcerer or one of Tzeentch’s daemons
    • Changehost – can only switch units in a pair once.
    • Changeling –
      • explains what enemy units treat it as part of their own army – they can move within 3″…
      • formless horror, can’t use weapons that have a star for the range, attacks, to hit, to wound, rend and damage – effectively excludes the large characters – no more losing Durthu to his own sword.
  • Balewind Vortex – no Changehost switching a Lord of Change up there.  You can’t put a Monster on a vortex by any means.  However, this change does not stop you putting a unit of horrors up there.  So you can still summon the balewind on an objective and watch the horrors claim the objective (in certain scenarios) from 5.5″ away on top of the vortex.

Final Thoughts

As should be clear by now, the Age of Sigmar FAQs are vital to understanding matched play.  While the core Age of Sigmar rules are four pages, we are increasingly reliant on a wider rule-set for matched play that includes the General’s Handbook 2017, battletomes, FAQs, Forgeworld and Compendium warscrolls.  It can be difficult stitching this material together unless you know the answers are out there.

So check out the resources section on AoS Shorts, get in touch, let me know what you thought of the show, and what outstanding questions you have.

Further Resources