
This week brings the second Creator Class interview – this time with Adam Trunzo (@Mr_Trunzo) on his amazing Seraphon display board which he took to Adepticon this year. Adam has had a great run of events winning best overall at Paca, fan favourite and 5th place at Holy Wars and 3rd overall at Adepticon 2018. Adam kindly took the time to explain the inspiration and process behind his amazing Seraphon display board which he took to Adepticon.
If you missed the first Creator Class interview, it was with Saul Painter (@WarbossKurgan, about his Age of Sigmar narrative project called “The Harrowmark”) – you can find it here. If you are interested in more hobby content , check out the hobby section of this site (currently a work in progress), and visit the home of the Age of Sigmar Narrative Event Organisers Network (the NEON). For more great looking armies, you can also check out the AoS Shorts Showcase section.
And, finally, as always, check out Dark Fantastic Mills for great 3D printed terrain perfect for wargaming. Its super versatile and light so worldwide shipping is inexpensive. Use the “aos shorts” discount code for a further 10% off the already decent prices.

Introduction
I started playing Warhammer in middle school, played through high school, took a ten year break, and restarted once I was in my thirties. Nothing groundbreaking there. I really enjoy Age of Sigmar due to its wide open creative space. I play several other wargames but none allow as much free space to create. I am a competitive player by all accounts. I live in a very rural community in Wisconsin, USA and so I only ever play games at tournaments. I don’t think I have played a single friendly game of Age of Sigmar for at least two years which means when I show up to a tourney I have had zero experience with my list!
My first and true love are the Skaven and I look forward to a time when they are ascendant once more. After seeing the Seraphon rules in the GHB 2017 I saw them as a very strong competitive army with their mobility and anti-demon abilities. The Midwest tournament scene runs from January through April so I had about three months to get the army from a pile of gray to finished in time for Adepticon 2018.
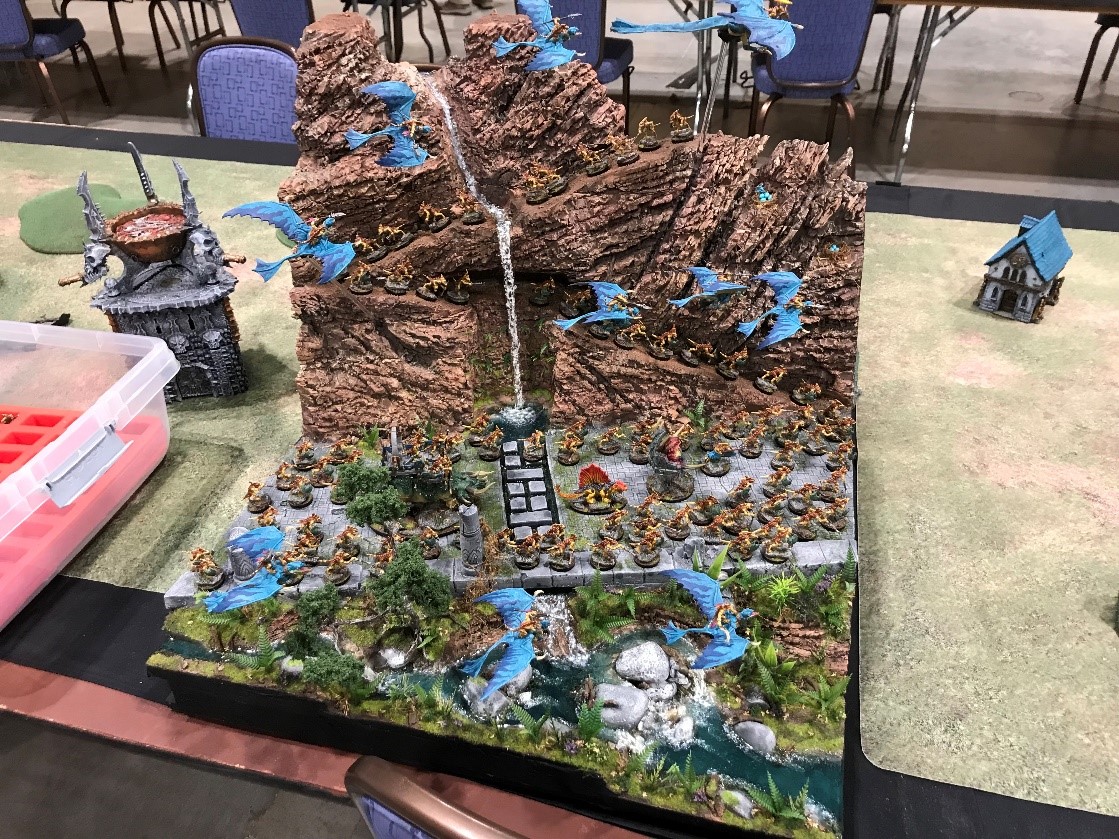
Adam’s Seraphon Display Board
AoS Shorts: What was your inspiration for the project?
Whenever I make a new display board I try to push my skills and explore some new creative techniques or styles. For this display board I wanted to practice some key new skill sets:
- Showing movement in water effects
- New ways to show natural rock formations
- Building vertically in a meaningful way
- Exploring novel perspective and symmetry rather than the ‘everyone face forward on a two-tiered hill with a statue in the middle’ style that is most common
- Stay within a 24”x24”x24” cube
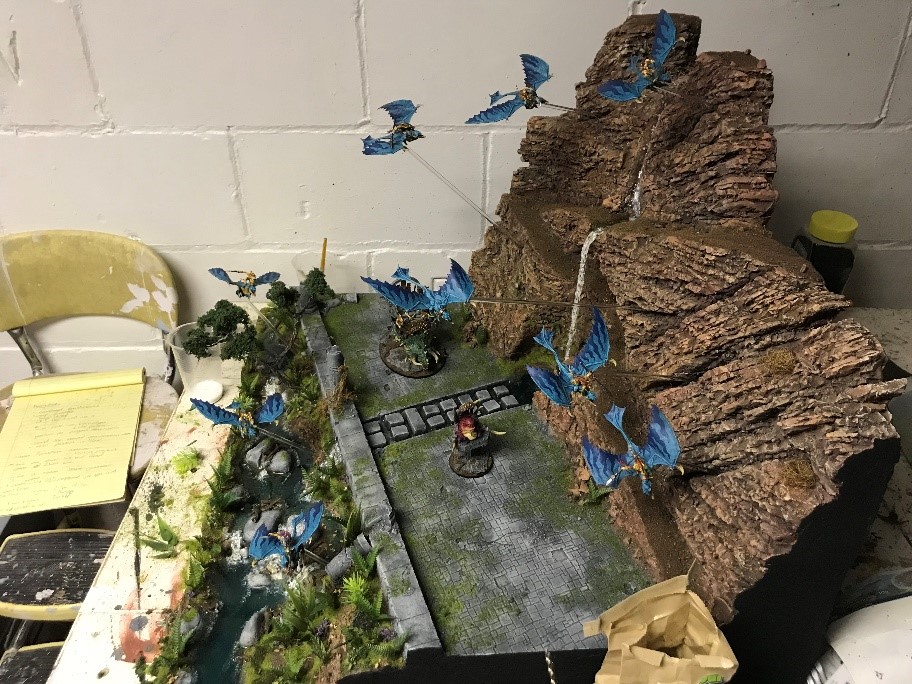
With the above goals I knew I wanted the army to be on the march with mountains/cliffs included. I wanted to show additional units joining the main force from different directions as they gather and I wanted the whole board to diverge from regular 90 degree angles. I also wanted to have at least one waterfall to help me practice this technique. With these goals in mind I started brainstorming.

AoS Shorts: How did you plan the project?
I went through several different conceptual layouts that included higher cliffs, cliffs on two/three sides, and a lot more waterfalls but they all seemed either too fragile to be practical or would distract too much from the army itself. I spent several days playing with pink foam blocks until I found the right layout. I decided to go for three generally symmetrical landscapes that would look striking placed together with a road in the middle, a stream to one side and a cliff face on the other.

AoS Shorts: How did you create the super-structure for the board?
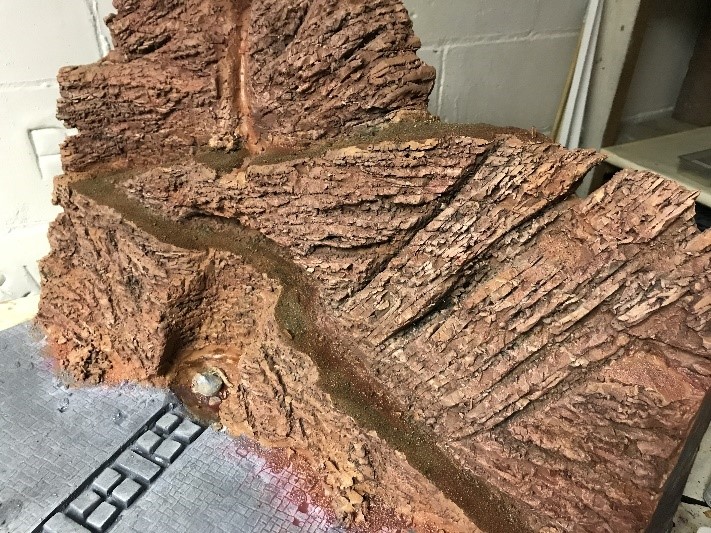
The main material for 95% of the board is just basic pink extruded styrene sheets. The elevation began low with the stream and gradually built upwards to the top of the cliffs. While laying out the board I took some time to lay out some bases to make sure the board could accommodate all the models of my army.

AoS Shorts: What materials did you use?
For the road itself I used a base sheet of styrene, roughed up with a little sandpaper and used a dull pencil to push in the lines for all the stonework. I then went back and added some sand, cracks, and used various hard square objects to push in certain stones here and there to keep it from being entirely flat. In my previous life I built hiking trails for a living and incorporated some of this knowledge into my board by adding a French drain to allow the water to flow over the road surface without slowing down my lizards.

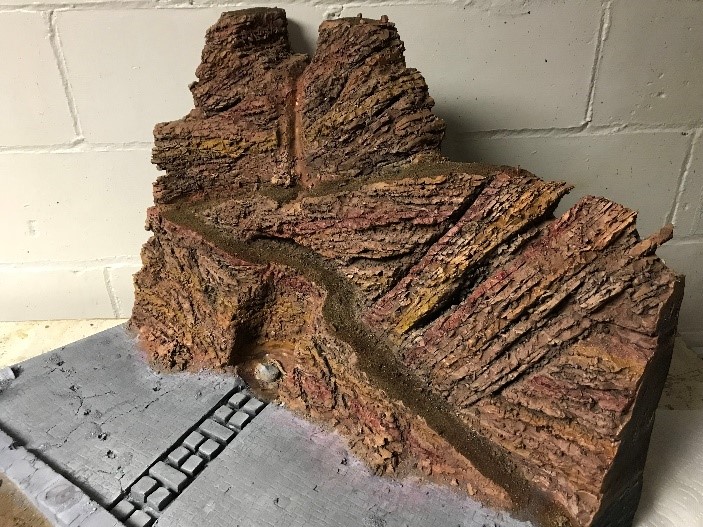
The cliff face was accomplished by gluing several styrene sheets together then using a 3” paring knife from the kitchen to cut out the basic shape of the cliff and the mountain trail. Just like with the French drain I was able to use my trail building knowledge to make the switchback and to make sure the trail made sense with regards to how the water would flow down the side. For the different rock strata I looked at geologic rock formations and some basic plate tectonics to decide the different directions the rock layers would flow. I then took the same paring knife as before and made a lot of quick parallel cuts into the foam about an inch or so deep. This was followed by using my fingers and the flat side of the knife to flick and tear at the loose edges of these cuts until it resembled the sort of erosion you might see in rocks like this. Once this was completed across the whole surface it looked a little too uniform so I went back in and made some drastic deeper cuts using this same method. I finished up the rock face with some minor touchups to help hide the lines where the sheets of foam connected. Once I finished with this I went back and carved out the grotto for the waterfall and added some texture to that as well.


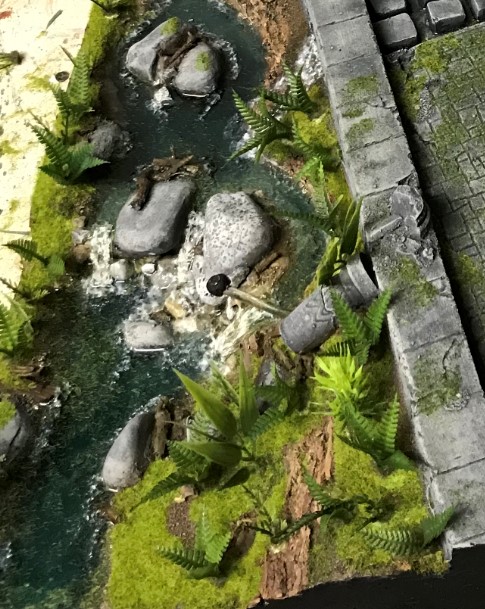
The stream bed kind of happened organically although I knew I wanted it to feature larger rocks in the middle and a fairly steep grade to allow for a lot of rapids for water effects. I thought about the movement of water and wherever I placed a stone that would naturally cause water to flow around it to hit the far bank I then dug out the bank using the same technique with the cliff face to create a small meander and make the stream more snake like. I think a common mistake made when using water effects is to not think of erosion or how water naturally flows to help shape the features of the board. The deeper water effects were made using Envirotex Lite mixed with Minitaire ghost tints 2 parts blue to one part green. I tested this with water beforehand to make sure I had the right color mix before using the epoxy. When pouring the epoxy I made sure to seal up the ends of the stream with pink foam that was covered in clear packing tape. The glossy side of the tape was facing the water effects to ensure a clean release. In order to seal these points I used just enough quick 5-minute clear epoxy for where the pink foam blocks met the board.
AoS Shorts: The waterfall and ripples in the river are very impressive – how did you get the sense of motion into the pieces? Any tips for placing water effects, ripples etc when creating a river?
For the waterfall I used Noch water effects and drew long parallel horizontal lines of it on a plastic bag. Once it was about half dry I went back with a frayed paint brush and stippled in white acrylic paint. The trick was to only stipple in one direction and try to make little V shapes as I went to look more natural. Once this was dry I peeled it off the plastic bag, cut it to shape, and glued it to the board using more of the same water effect. After adding it I noticed the waterfall just went straight down off the cliff so I added a curved piece of plastic behind the water fall to make it look like it was flowing off the cliff in an arc.

The larger rapids on the stream were done the same way as the waterfall, just smaller. For the whitewater around the rocks I used a very small amount of the water effect and stippled quite hard with my paintbrush. As the brush starts to lose paint and water effect I started stippling further downstream to give it a sense of calming down after the initial disturbance.


AoS Shorts: Your foliage is amazingly diverse and realistic – any tips or advice for those looking to create similar projects?
I think the biggest thing is to use nature as a reference. When I see a scene in nature with plants and other living things I break it down into component layers and try to think about which layers need to go down before the others so they all look natural. I think the biggest thing to avoid is just making clumps of the same type of grass, tree, bushes, etc on a board. Try mixing it up and adding as many layers as possible just like in nature. The results are usually worth the extra time spent.


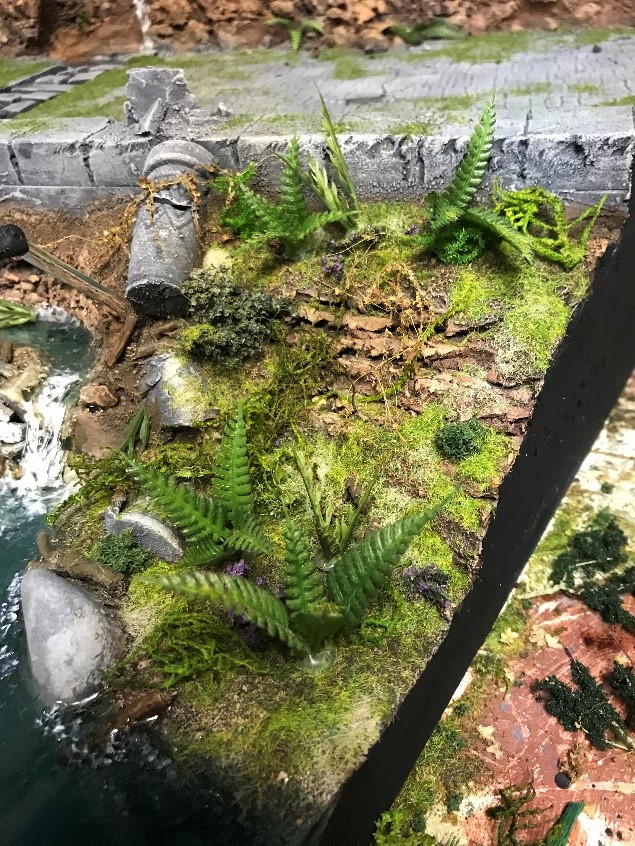


Added a tree for some height and variety made out of picture hanging wire and caulk.
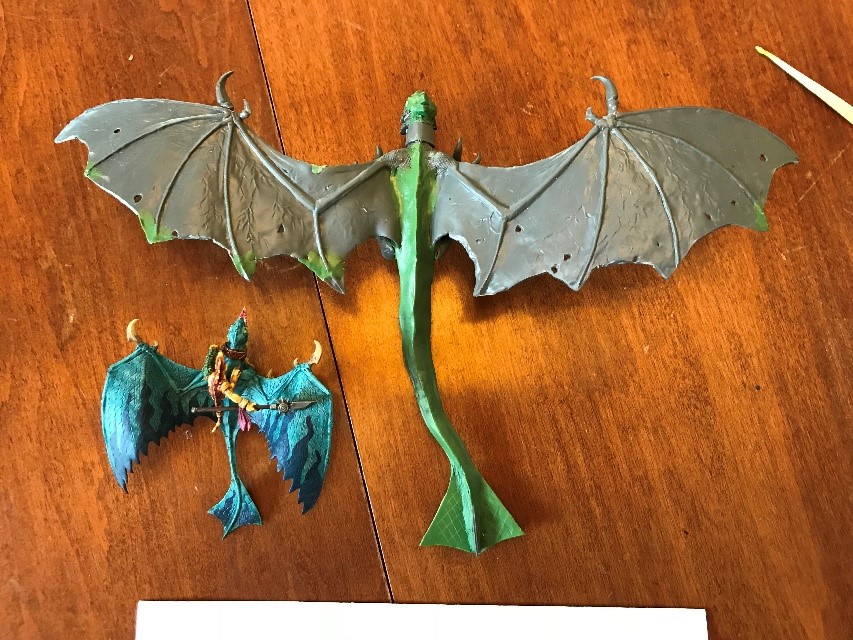
AoS Shorts: You made a custom-built Momma Ripperdactyl for the project – how did you go about that conversion and what inspired you?
I had tried out a number of different Stormcast allies for my Seraphon until I settled on the Celestant-Prime. Tactically this model was a perfect fit as it punishes armies that bunch together while my 9 ripperdactyls punish armies that spread out. After thinking about how to best theme the Prime to my army I thought about just doing a giant ripperdactyl. The idea of a big momma ripperdactyl coming out of the skies to protect her poor little babies was too cool to pass up so I got to work planning it all out.
Since the rest of the army was GW models I figured I would make this out of GW parts and so used the Lord of the Rings Fell Beast as a base and sculpted out a larger tail and wings out of green stuff. I had to bend the wings using heated up salt that I dipped the plastic into to evenly heat then slowly bend to a shape that more closely resembled the wings of the rippers. I used the claws from a zombie dragon kit for the wings and feet and used the zombie dragon head as a base with some added green stuff to complete the conversion.


AoS Shorts: How did you make the Ripperdactyls detachable so that they could be both effective display and gaming pieces? Magnetized flight stands?
I magnetized the flight stands using small flat magnets making sure they were all the same side of the magnet so any ripper could go on any stand. I drilled out and placed another magnet on the ripper where the flight stand normally sat to allow a solid and fairly well hidden connection. I purchased some clear acrylic rod and drilled holes into the board at angles to give the appearance of the rippers swooping around in formation. Since some of these rippers were tilted to one side or the other I had to create a little green stuff platform for them to sit on at the end of the clear rod to make sure the rippers wouldn’t shift due to gravity.

AoS Shorts: How long did it take you?
The army itself took two months to build and the majority of the board was done in a month. The finishing touches took about another week to get ready.
AoS Shorts: Did you write the army list and take into account unit choices in order to fit the display board or improve the overall appearance?
I did not build the board based on any particular list. I just made it so it could hold 100+ infantry and 4-5 large monsters comfortably with a few spots that could draw attention to key characters or models
AoS Shorts: Are there any resources or videos that you would recommend for someone looking to build a similarly ambitious display board or improve their own skills?
This video covers how I made the rock layers.
This video helps with the stream and resin pour:
Here is a great guide to waterfalls.
This page covers using salt to bend plastic:
Papercuts is an amazing resource for highly detailed terrain work.
Kathy Millat is a great and entertaining source for masterclass terrain.
AoS Shorts: Anything else you would like to cover?
It seems like the way Age of Sigmar terrain rules are written encourages the use of distinct and evenly spaced terrain features for your gaming table. My best piece of advice is to use your display board to break from that concept and build terrain the way it was meant to be, messy. Landscapes and terrain in nature blend together, erode, grow, intermingle, fall down, and mix in all sorts of wonderful ways. Display boards are a great way to make the Mortal Realms come to life in new and interesting ways instead of gluing two or three terrain kits down on a piece of plywood and calling it a day.
Leave a Reply
You must be logged in to post a comment.